Some of the links in this post are affiliate, which means we may earn a small commission if you make a purchase, at no extra cost to you. As an Amazon Associate, we earn from qualifying purchases. Thanks for being here! Learn more.

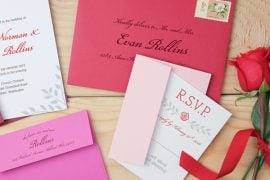
There are countless projects that you can DIY for your wedding. From wedding centerpieces and favors to food and even your dress, while you can DIY each of these on your own, it doesn’t always mean it’s worth it. After all, time is money! However, one big ticket item we do think you should doing at home are DIY wedding invitations.
“Planning a wedding can be stressful, but with a plan in place, available tools, and time, you can create a one-of-a-kind invitation design with an incredible feeling of accomplishment,” says Marci Guttenberg of An Affair To Remember.
In this article we’ll go over the tips and resources you need to make beautiful DIY wedding invitations at home. But first, let’s go over why you should DIY your wedding invites.
Why You Should Consider DIY Wedding Invitations
There are tons of reasons why you should consider designing and printing out your wedding invitations in the comfort of your home. Here are the top four:
They save you money
Budget is top of mind for so many brides and grooms, and DIY wedding invitations are a great way to save money. “Whether you design the invitations yourself or buy a pre-designed file from sources like etsy.com, you will save money by doing the production on your own versus ordering them pre-printed,” notes Schuyler Polk, owner of Polk Paper in Tenafly, New Jersey.
It offers a quick turnaround
Time is of the essence when you are planning a wedding, and DIY wedding invitations can help if you’re short on it. While most print shops have several weeks or even months of production time, printing your invitations at home can be a much quicker solution. What’s more, Kelsey Garrison, owner and calligrapher at Lairsey Paper Co. in Atlanta, Georgia, points out that many printers and stationers can suffer from postponements. “Stationers may book up, so if you are wanting to move quickly, it may be smart to handle printing yourself.”
You can avoid large print minimums
Many vendors have minimums in place that make it difficult or expensive to print just a handful of invitations, explains Garrison. If your wedding is only a group of close friends and family in your backyard, you certainly should not have to spend more than you need to. “Printing from home allows you to avoid those large minimum requirements and to print exactly as many as you need, no matter how small the number,” adds Garrison.
It’s easy to make last-minute changes
“Having access to your invitations at home—better yet, having access to the design file—ensures that you can make last-minute changes without needing to forward the information to someone else,” says Thomas Waters, Senior Sales at The Renaissance in Richmond, Virginia. “Working in a venue, I know firsthand that these changes are easier said than done when working on a time crunch, so it can certainly put your mind at ease knowing that this is easily accessible.”
What You Need to Print Your DIY Wedding Invitations At Home
Here are the key pieces of equipment experts say you will need if you choose to print your invitations at home.
A laser printer:
This one might sound pretty obvious, but not just any printer will allow you to create high-quality invitations at home. You will need a laser printer, which uses toner powder and heat to set the ink into paper, or an inkjet printer, which uses liquid ink to deposit ink onto paper, explains Polk. “Laser printers are great for printing on metallic cardstock, for simpler designs, and are also much faster than your standard inkjet,” she says. “I have an HP LaserJet Pro 200 color and a Canon Pixma Pro-100 for my in-house printing projects and utilize both for different project types.”
Ink:
In order for your printer to work, it needs ink, so don’t forget to factor this into the cost of your DIY invitations. Ink can get expensive, so be sure to look for sales on Amazon and other retailers like Staples.
A heavy duty paper cutter:
If you are working with smaller projects, Culkin recommends saving paper by creating multiple projects on one sheet, and then trimming them down to the appropriate size. A paper cutter can allow you to do this with impressive accuracy.
A tape runner:
For sealing envelopes, Polk suggests saving your tongue and buying a few rolls of double-sided adhesive tape runners. “I use a large-format Scotch Advanced Tape Runner since I make custom liners every day, but for a single project, a few packs of double-sided adhesive tape runners will make your life much easier for mounting pages, closing envelopes, and mounting envelope liners,” she says.
Quality cardstock:
“Quality paper is going to keep your invitations looking chic and elevated,” notes Waters. “Websites like Paper Source are wonderful for purchasing card stock and envelopes, plus you will have guides that help you navigate various template sizes and more.” Not sure which kind of cardstock to get? See if you can order samples first.
WGM Says: One negative of DIY wedding invitations is that you typically can’t use super thick paper stock. To give you an idea of thickness, a premium business card might weight 130 lbs (paper weight is measured in pounds), while standard printer paper is 20 lbs. Most home printers can go up to 80 lbs (and some 100 lbs), however be sure to check the specifications of your printer first. If you really want to go with thicker paper, you can consider buying a heavier cardstock and taking your design to a local printer instead.
Design software:
Waters recommends that briefs and grooms looking to design or print their wedding invitations at home have access to Adobe Illustrator or another similar software. “Whether you will be designing the invitation yourself or enlisting the help of a small business, you will want to be able to open the file and print without issue,” he says. “Additionally, it is important that you can easily go in and adjust the size if you’re printing invitations on specialty paper.”
Envelopes:
Garrison recommends Paper Source as a great resource for envelopes. “Many cities have a store location where you can go in-person to pick out envelope colors and combinations,” she says. “Even if you don’t have a location near you, you can find everything you need on their website! You will need an outer envelope and a response envelope.”
A copy-checker:
If you are taking the lead on creating your own wedding invitations, it is a good idea to have your partner or another person close to you take a read after every single change you make to ensure that the spelling and the layout is as you intended. “The last thing you want is to have to spend more money and time by having errors and needing to redo your invitations,” points out Guttenberg.
How to Find the Best Design for Your DIY Wedding Invitations
Before you get to printing, you will want to make sure you get your designs squared away. Unless you’re a skilled designer or have some experience making your own designs, you’ll want to look for a customizable template. Thankfully there are several websites that make this easier than ever. Here are the resources experts recommend.
Etsy.com
This wonderful website offers hundreds (if not thousands) of shops that sell pre-designed invitation suites, notes Polk. “You will likely discuss the personalization and details of the design with the shop owner and then purchase the file,” she says. “Many owners include printing instructions on how to set up the files for print.”
Creativemarket.com
This website offers countless design resources for DIY wedding invitations, from fonts to invitation templates to graphics, notes Polk. In fact, it is one of her go-to resources for unique illustrations. “With the creative market, you can purchase a personal license for any personal project, like your wedding, and then download the files,” she says. “Each shop will tell you the file formats that are included, for example a .jpg or .png (image file), a .pdf or specific design files like .ai (illustrator) or .indd (InDesign).”
Canva.com
This program simplifies the process of designing DIY wedding invitations—and it is free! “With customizable templates and drag-and-drop features, Canva is an easy-to-use design program for the inexperienced designer,” says Garrison.
Tips for Adding a Personal Touch to Your DIY Wedding Invitations
One of the biggest perks of creating DIY invitations is that you don’t have to worry about anyone else having the same invite as you—it is unique for your big day. Here are some fun ways to go above and beyond to make your invitations stand out.
Add engagement pictures to your invitations:
If you and your soon-to-be spouse took beautiful engagement photos, your DIY wedding invitations are a wonderful place to put them to good use. If you go this route, however, Shelby Kirchner, owner and lead planner at Plan On It ATX in Austin, Texas, recommends scheduling your engagement photo session early enough so that you have the pictures back well ahead of when you need to send out your save the dates.
List your wedding website:
“Instead of including all of the nitty-gritty details on paper in your invitation suite, list your wedding website and have all of the necessary details there,” says Kirchner. “This could save you space on your invitations and lead guests right to your website where they can learn more about your big day”
Make your stamps stand out:
Head to your local post office to see what new stamps are being offered and choose one that makes a statement for you as a couple. “There are really beautiful options out there at any given time, from stamps with animals, flowers, hearts and fruit on them,” says Mikkel Woodruff, owner of Mikkel Paige Photography who works in North Carolina, Florida, D.C. and New York.
Include a custom wax seal:
Kirchner recommends buying a custom wax seal with sticker backings to further enhance the look of your DIY wedding invitations. “It instantly makes your invitations look nicer and more expensive with little extra work involved,” she says.
Have fun with color:
“If your invitation template allows you to change the colors of the text and designs, play around with it,” says Kirchner. “Make sure to keep the color consistent with your wedding day colors so it is all cohesive and don’t be scared to make bold design choices that really speak to you.”
When to Send Your DIY Wedding Invitations
Just as with invitations that you purchased from a stationer, it is very important to be mindful of the timing of when you send out your wedding invitations. This is true now more than ever, given the timing restraints brought on by the coronavirus pandemic.
If you can swing it, the ideal timeframe for sending out wedding invitations is 8-12 weeks, according to Polk. “The sooner the better, especially coming out of a pandemic, as people are excited to receive the invitations further in advance so that they have more time to consider their travel plans.”
Giving yourself enough time also ensures that you can order more supplies if needed. “Assume everything will take longer than you think, as it is much better to be done ahead of time than with not enough time,” says Woodruff. “Additionally, leave time for supplies to reach you in case you have to order any samples, and things like ink, paper, and stamps, and time for assembly as well, and make sure you make at least 5-10 extra invitations, at a minimum.”
Last, but not least, have fun with this process. If DIY wedding invitations are going to be a major headache and stress-inducer for you, consider hiring a professional. Your time being engaged is precious and is meant to be enjoyed!
DIY Wedding Invitations FAQ
Typically, yes. You can save more than half on DIY wedding invitations vs. online options. You can find out how much wedding invitations cost according to where you buy them.
First, start with a great design. Etsy is one of our favorite places to find templates online. Then, opt for a nice-quality paper. Find out the thickest paper your home printer can accommodate, and use that. Or, if you can opt for a local printer instead. You’ll still save since you’ll be buying the design and paper on your own. Finally, consider accessorizing your invitations. Envelope liners and/or wax seals and belly bands make great final touches.
One of the best places to find tutorials is on YouTube. That way you can actually see each steps the designer is going through, as well as get product recommendations.
Some links in this post may be affiliate links, which means we may earn a small commission if you make a purchase through them. Thank you for your support!